A question I often get asked is what my workflow is like once I get back to the studio. Ok, you’ve taken the shots, they are on your Compact Flash or SD card, now what do you do with them? In this post I will walk you through the dirty details of how the images come off my camera, get organized, edited and posted all over.
Step one….Adobe Photoshop Lightroom, often referred to simply as Lightroom. If you don’t have it you can download it for free here for a 30 day trial. This one program helps you import, manage, pick choice shots, edit and upload your photos to be displayed on most major photography websites & social media sites.
Let’s start when you put your memory card into a card reader, or simply connect your camera to your computer. I’m going to use my recent camping trip in Colorado as an example. Once inside Lightroom, select the Import Tab. There were MAJOR changes from Lightroom version 2 to version 3. I will be displaying V3 even though V4 has already been released.
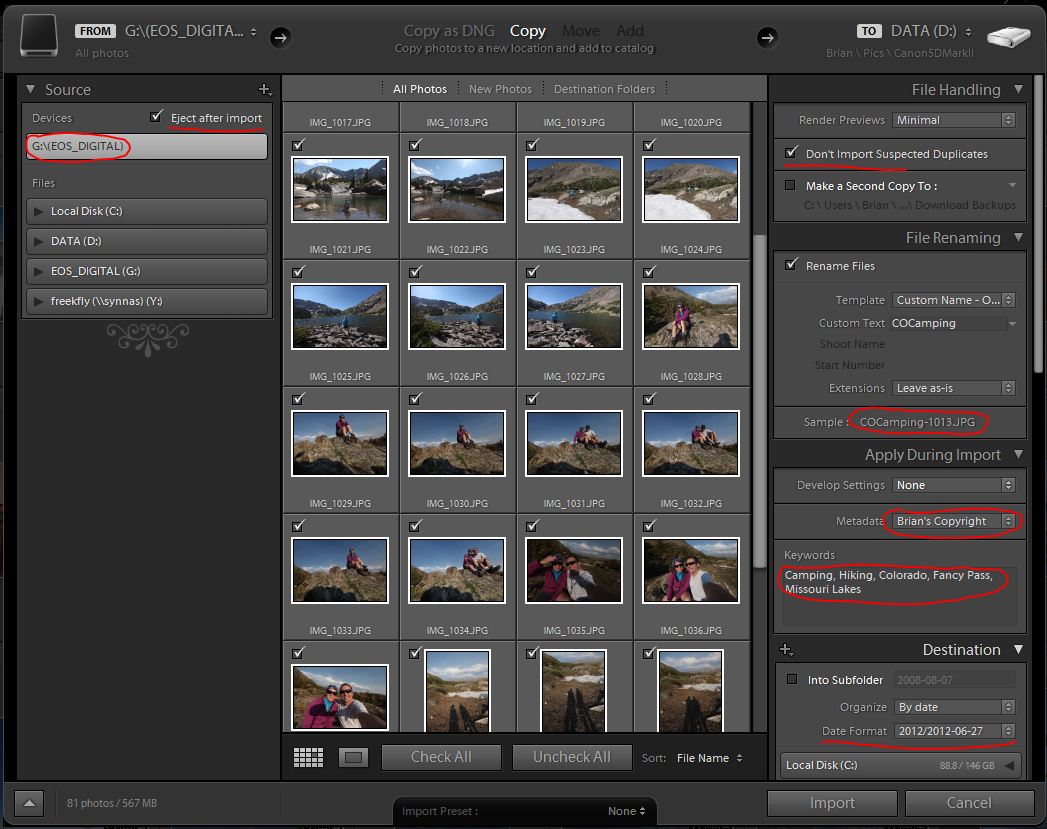
Importing is a VERY important step. During this one step you drastically effect how you see and manage your photos down the road. Here are some highlights:
- I always select to COPY (instead of move) my photos so that it leaves them on the card / camera just in case something goes wrong during the import.
- Check Eject After Import. This saves time later and makes sure your card isn’t corrupted when you remove it from your computer once the images have been imported.
- Make sure the Don’t Import Suspected Duplicates is checked. If you forgot to Format your card before a shoot, checking this box won’t re-import previous shots already in Lightroom.
- RENAME YOUR FILES!!! This is huge. If you’re reading this blog, then you have to at lease be some what interested in taking pictures. If that’s the case, then you will inevitably have thousands of images to manage and keep track of. Choosing a name that makes sense, in this case “COCamping”, it will immediately trigger these shots when referenced down the road. I choose to leave the Original Image Numbers that the camera assigns, 0001 – 9999. Once you hit 10,000 images on your camera, it will reset to 0000, at least on the Canon’s. You can also choose to change the numbers to a Sequence that starts with 1 and goes up. For Canon’s, you can keep track of your total shutter release count this way to estimate the life of your camera.
- Metadata is information digitally tagged to each and every photo imported. I add a Copyright Notice that I created ahead of time, then I add Keywords so that I can search on them later.
- Finally you pick your destination. I have a folder on my computer where I keep all of my original images. In that folder, they are organized by Year and then Date, ex: 2012/2012-06-27
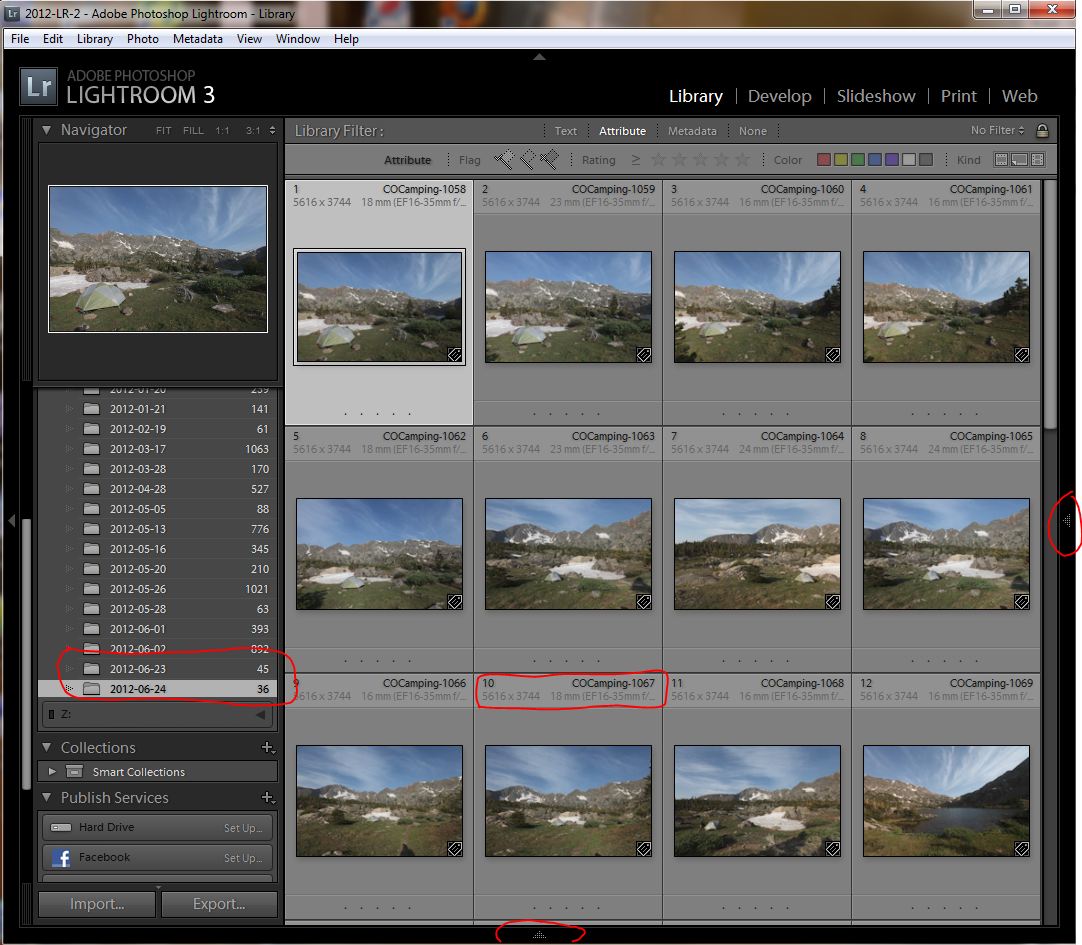
As the images start to import, you are brought into Library Mode. This is a grid view showing you the Current Import of the photos as they progress and copy over. On the Bottom, Top, Right & Left, there are panels that can be hidden. There is also a display that show you Attributes of each photo. By default, no attributes are assigned. You can Flag images (Pick or Reject), give a Star Rating 1-5 or even Color Code images. Then from the attributes window you can select an attribute to filter on, only showing that subset of images.

In this next screen shot I’ve hidden the panels so I can see more of the images and have a better view of one image once it’s pulled up. Since my camping trip spanned 2 days, the import process created 2 folders for the 23rd & 24th. In most cases, I want to keep all of these images in 1 folder to help streamline the process. So I highlight all from 1 folder and drag them into the other in order to consolidate. I also choose to have the Image Name, Image Size (In pixels) and the zoom of the lens as well as what lens was used while shooting.
Each section that you’re in has a series of Shortcuts. Hitting CTRL ? will display them for you.
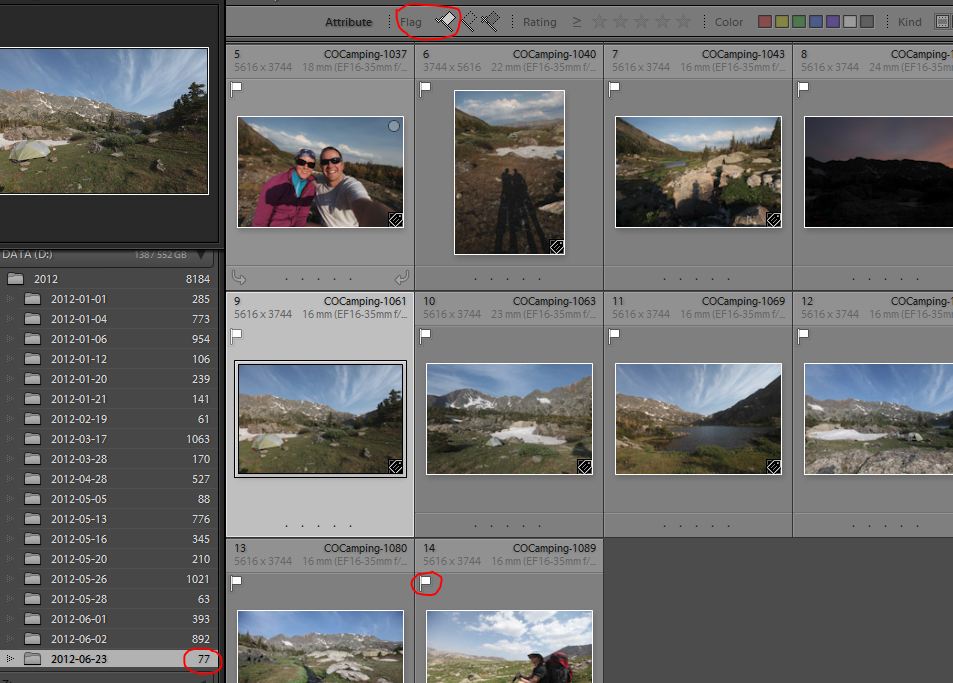
Once this is complete, I can go back to Grid view and select a filter to show me only the Picked shots or only the Rejected shots. (Quick tip, I show ONLY my rejected shots and then highlight them all and delete them from my computer to save disk space) As you can see, I’ve reduced my total image count to 77, I’ve selected the Flag Filter above and am now showing ONLY the Flagged shots, 14 total.
Ok, I’ve imported, gone through and removed the trash as well as highlighted shots I want to work on. Now it’s time to edit. Hitting “d” gets you into Development mode and the editing of each shot begins.
On the right you can see the different slide tools you can edit with. Cropping, spot removal, etc…. You even see the camera settings on the shot. Again, hit CTRL ? to see more shortcuts in Development mode. Since this is a Workflow post, I’ll leave the development section at that. Hitting the Right arrow gets you to the next image and clicking the Previous button applies all of the previous images edits to the current image.
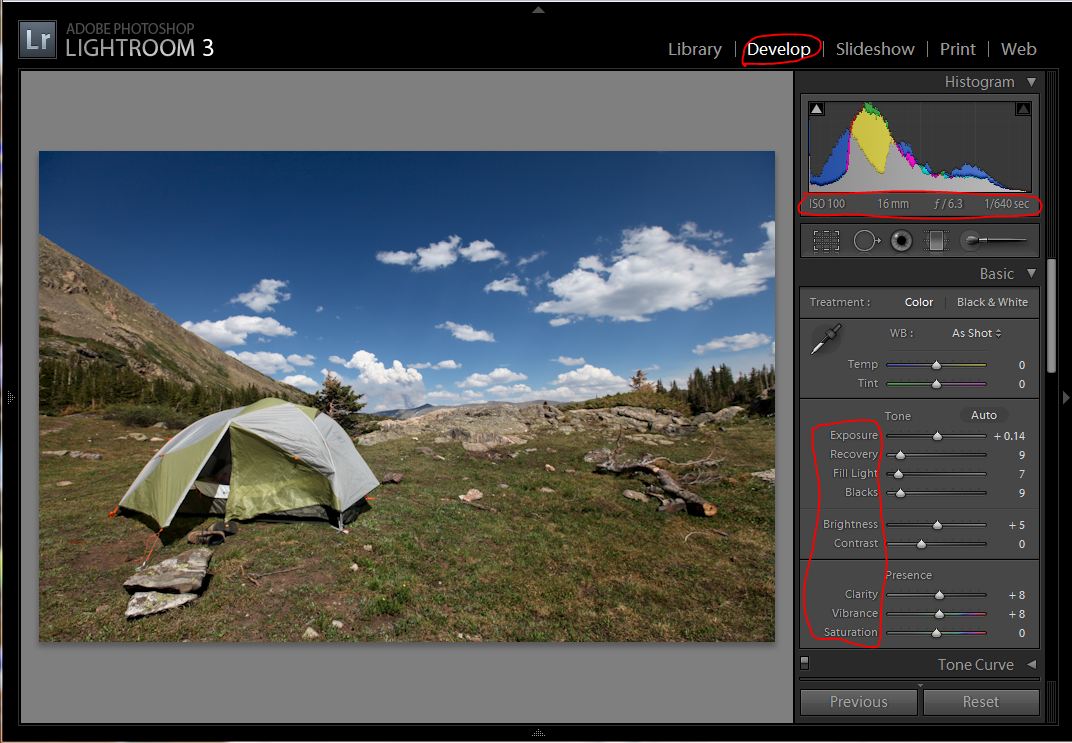
Something VERY important to understand about how Lightroom works. What Lightroom is, is essentially a database of changes and filters that you made to an image (All the edits you’ve made). Lightroom keeps track of that. The original image files haven’t ever been touched. No changes were made to the original file. Think of all of the above modifications as a series of filters that are applied over the original image file, but stored only within Lightroom. This is VERY important because every time you open and save a JPG file, it acts like a photocopy. If you photocopy a paper 10 times, the 10th copy is not nearly as nice as the original. Same goes for JPG’s. Each time you save it, you lose a little from the original, which is why it’s so important to safeguard and never save over your original JPG files. If you’re wondering HOW you can go about seeing these changes and display your images to the world or simply export them for printing, here is how.
Go back into Library Mode and select the images you want to Export and click Export. This opens a new popup window and asks you several questions. A VERY IMPORTANT step is to make sure that the Export Location Folder is Different, and not Under the folder where the Original Image Files exist. I have a separate LightRoomEdit Folder I use. You don’t ever want to overwrite the original files and if you put them in a sub folder, Lightroom will want to import them if you ever use the synchronize utility. Most of my work is being displayed online, so reducing the quality to 84%, dropping the image size to 950 pixels on the long side and reducing the resolution to 72 ppi is what I need. These settings are GREAT for online viewing, but don’t allow the end user to print anything larger than a 4 x 6 print. Any print of an image downloaded from my website bigger than a 4 x 6 results in a print that isn’t any good. This helps ensure that people online can’t just download and print your image. Another thing to ensure that is your Watermark.
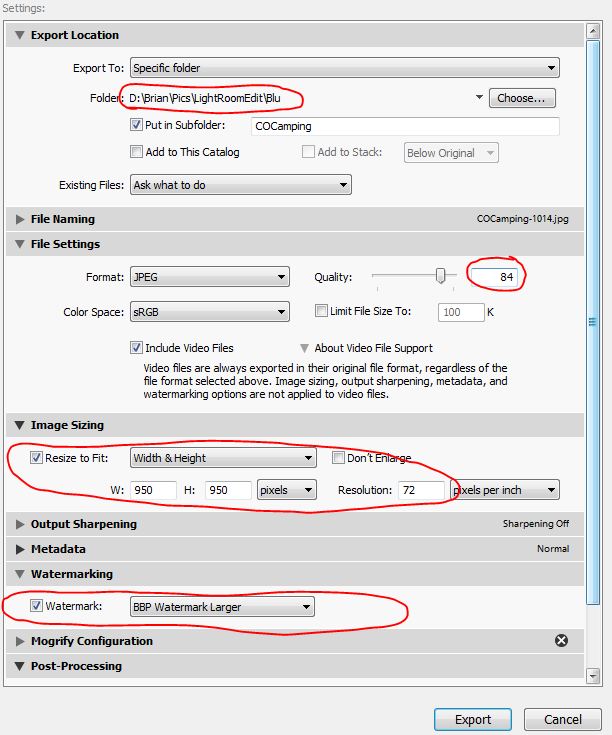
When it’s all said and done, there are MANY ways to export or publish your photos. Lightroom has a publishing service built in and there are also plug-ins to sites like Zenfolio where they upload directly to your preconfigured website. Getting your photos OUT of Lightroom is not an issue at all. One thing to note; when I choose to print my images, I make sure to export a FULL SIZED image, i.e. Quality at 100%, Resolution at 300 ppi and no resizing. It’s a much larger file, but in order ensure the quality, it’s the best way to go.
Well, that about wraps up my workflow process. Tips on HOW to use Lightroom….My biggest suggestion would be to open up iTunes and search the Free Podcast section for Lightroom. You will find tutorials and How To’s that will make you a pro. Spend a few hours watching and practicing and you’ll ace it in no time.
Please post questions in the comments area below and I’ll do my best to answer them!